Scraper Blades to Feeding Hoppers: A Weekly Roller Compactor Maintenance Checklist for Compactors
Let’s be honest for a second: if you’ve spent any time managing a pharmaceutical manufacturing floor, you know exactly how stressful unexpected equipment downtime can be. When your compactor goes down, the entire dry granulation line grinds to a frustrating, expensive halt. It is a sign to understand and start immediate roller compactor maintenance checklist and take action accordingly.
You’ve got operators standing around, batches sitting unfinished, and production schedules getting thrown completely out the window. But the truth is, most of these sudden breakdowns don’t happen out of nowhere. They are usually the result of small, ignored wear-and-tear issues that finally hit their breaking point.
That is exactly why relying on a solid, repeatable roller compactor maintenance checklist is the absolute best way to protect your equipment and your sanity. By setting up a dedicated routine every single week, your maintenance crew can catch a dull blade or a loose fitting long before it ruins a batch or damages the machine.
We are going to walk through the practical, nuts-and-bolts steps of dry granulation equipment care, focusing on the real-world checks that actually make a difference on the factory floor.
Getting Hands-On with Scraper Blades Inspection
If there is one part of your compactor that takes a constant beating, it’s the scraper blades. These parts are literally pressing up against rotating metal rollers under serious pressure all day long, trying to keep your powders from gumming up the works.
When a scraper blade starts to wear down, even just a tiny bit, powder sneaks past it and sticks to the roller surface. Before you know it, you are dealing with uneven ribbons, weird gap measurements, and a batch that quality control is going to reject outright.
Making a proper scraper blades inspection a non-negotiable part of your weekly roller compactor maintenance checklist is going to save you a ton of headaches. You can’t just glance at them from a distance, either; you need to get in there and actually feel the edges.
Swapping out a worn blade is cheap and easy. Having to resurface a damaged roller because a bad blade let abrasive material build up? That’s going to cost you serious time and money.
- Feel for the micro-damage: Once the machine is locked out and safe, put on your gloves and physically run your fingers along the edge of the scraper blade. You are feeling for tiny burrs, rough spots, or uneven wear that your eyes might miss under the harsh factory lighting.
- Check the tension settings: A blade is only as good as the pressure holding it in place. Grab your tensioning gauge and make sure the blade is pressing against the roller with the exact force the manual asks for. Too loose, and powder slips by. Too tight, and you’re just grinding the blade down prematurely.
- Clean the mounting hardware: When you pull the blades off for ultrasonic cleaning, don’t ignore the brackets and screws holding them in place. Hardened API or powder hidden in those threads will throw off the alignment when you put the clean blade back on.
The Reality of Feeding Hopper Calibration
Your feeding hopper might just look like a big metal funnel, but it is actually the control center for your entire material flow. If the powder isn’t moving smoothly from the hopper down into the feed screws, the rest of the machine simply cannot do its job. When powders start sticking to the sides—causing those annoying bridging or rat-holing issues—the rollers get starved of material.
The machine panics, the hydraulic pressure spikes and drops, and your ribbons come out looking like a mess. Keeping that hopper flowing requires more than just a wipe-down. You have to ensure that the internal sensors actually know what’s going on inside. Feeding hopper calibration needs to be on your weekly radar because if the sensors get blinded by dust, they’ll send bad data to the control panel, throwing your feed speeds completely out of whack.
- Inspect the surface finish: Get a good light inside the hopper and look for dull spots, deep scratches, or any areas where the stainless steel has lost its polish. Rough patches create friction, and friction is exactly what causes powder to clump up and stop flowing.
- Check the seals around the agitator: Take a very close look at the seals where the agitator shafts meet the hopper walls. If powder is working its way past those seals and into the bearings, you are on the fast track to a seized motor.
- Wipe down and test the sensors: Find your level and proximity sensors, clean them off with a safe solvent, and do a quick loop test at the panel. You need to know that when the hopper is getting empty, the sensor is actually telling the PLC to speed up the feed.
Checking Compactor Rollers Alignment and Surface Wear
The rollers are the undisputed heart of any pharmaceutical roller compactor. They do the heavy lifting, taking fluffy, aerated powder and crushing it into a dense, solid ribbon. Because they are doing so much work, they are incredibly sensitive to alignment issues. Factory floors vibrate constantly, and over a week of heavy running, that vibration can easily knock the rollers slightly out of parallel.
If you ignore compactor rollers alignment, you’ll end up with a ribbon that is thick on one edge and thin on the other. That uneven ribbon will mill poorly, giving you a terrible granule size distribution.
Plus, if you are running abrasive excipients, the textured surface of your rollers can take a beating. Checking these heavy steel components needs to be a primary focus of your weekly routine to guarantee you are getting the crushing force you actually need.
- Verify the gap parallelism: Don’t just trust the digital readout on the screen. Use precision feeler gauges (safely, while powered down) to physically check that the gap between the rollers is identical on the left, right, and center.
- Look for trapped material and pitting: Grab a magnifying mirror and check the knurled or corrugated pockets on the roller surface. If they are packed hard with old material or if you see actual metal pitting, the rollers aren’t going to grip the powder properly.
- Test the cooling system flow: If your machine uses water-cooled rollers to protect heat-sensitive APIs, check the pressure at the inlet. A drop in water pressure usually means you’ve got scale buildup inside the roller channels blocking the flow.
Getting Dirty with the Hydraulic Pressure Check
You can have perfect rollers and sharp blades, but if your hydraulic system is weak, your compactor is basically useless. The hydraulic cylinders are what physically hold the rollers together against the massive outward pressure of the compressed powder.
Doing a proper hydraulic pressure check is how you catch failing seals before they blow out mid-batch. Alongside the hydraulics, you have the lubrication system. These machines generate a lot of friction, and if grease isn’t making its way to the main bearings, they will overheat and seize up in a matter of hours.
Tracing lines and checking fluids isn’t the most glamorous part of the job, but it is arguably the most critical step in your roller compactor maintenance checklist.
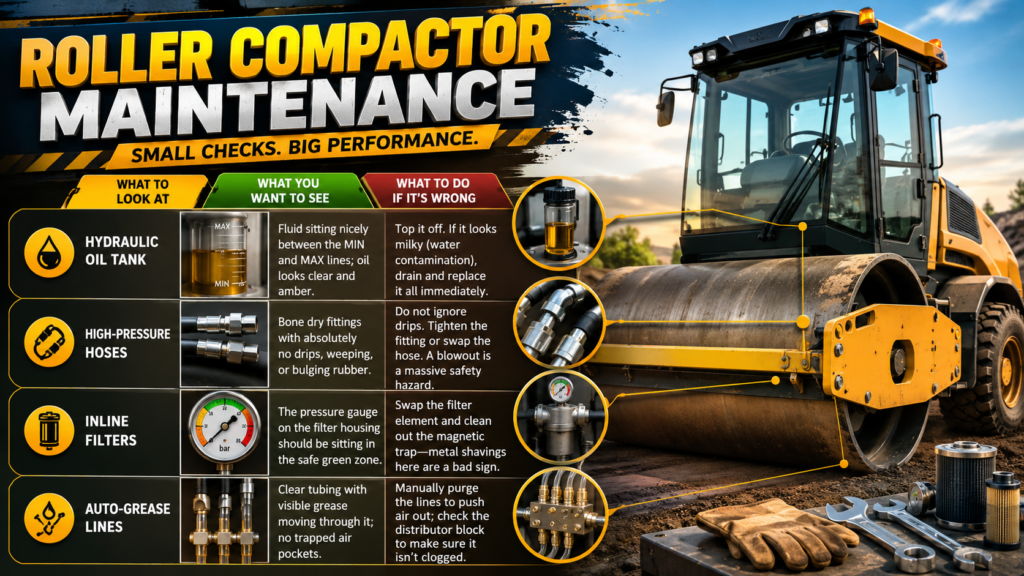
Table: Roller Compactor Maintenance
| What to Look At | What You Want to See | What to Do if It’s Wrong |
| Hydraulic Oil Tank | Fluid sitting nicely between the MIN and MAX lines; oil looks clear and amber. | Top it off. If it looks milky (water contamination), drain and replace it all immediately. |
| High-Pressure Hoses | Bone dry fittings with absolutely no drips, weeping, or bulging rubber. | Do not ignore drips. Tighten the fitting or swap the hose. A blowout is a massive safety hazard. |
| Inline Filters | The pressure gauge on the filter housing should be sitting in the safe green zone. | Swap the filter element and clean out the magnetic trap—metal shavings here are a bad sign. |
| Auto-Grease Lines | Clear tubing with visible grease moving through it; no trapped air pockets. | Manually purge the lines to push air out; check the distributor block to make sure it isn’t clogged. |
- Ramp up the pressure manually: Put the machine in maintenance mode and dial the hydraulic pressure up to its maximum safe limit. Watch the gauge. If the needle slowly creeps down, you’ve got an internal leak in one of the cylinders.
- Inspect every inch of the pneumatic lines: Cycle your air-actuated gates and seals. If they open sluggishly or you hear hissing, you have an air leak that will mess with your automated sequences.
- Look for fresh grease at the collars: Actually check the main roller bearings to see if fresh grease is weeping out slightly. It’s the only way to know for sure that the automated greasing system is actually delivering the goods to the end target.
Electrical Panels and Safety Interlocks
It is easy to get so focused on the mechanical parts—the gears, rollers, and hoppers—that we forget these machines are run by highly sensitive electronics. The constant shaking of the compaction process is notorious for rattling electrical wires loose inside the main control cabinet.
A loose wire can cause intermittent faults that will drive your operators crazy trying to diagnose. Wrapping up your weekly routine means opening the electrical panels, managing the dust, and making absolutely sure the safety systems are doing their job. A machine this powerful can be dangerous if the safety interlocks fail, so testing them isn’t just about machine health; it is about keeping your team safe on the floor.
- Try to trick the safety doors: While the machine is in a safe, unpowered testing state, pull on the guarded doors and hit the emergency stops. You want to see the control panel immediately flash a fault and lock out the motor drives. Never let a bypassed switch slide.
- Snug up the terminal blocks: With the main power locked out entirely, take a small screwdriver and gently check the tightness of the wires on the main terminal strips. You’ll be surprised how many wiggle loose after a week of heavy production.
- Vacuum out the cabinet filters: Variable frequency drives generate a lot of heat. If the cooling fans on the electrical cabinet are choked with factory dust, the drives will overheat and shut the machine down. Vacuum the filters and keep the air moving.
FAQs for Roller Compactor Maintenance
How often should a roller compactor really be serviced?
For the best results, operators should do a quick visual check daily, maintenance should run a full checklist weekly, and you should bring in a certified tech for a deep preventative maintenance (PM) teardown every 6 to 12 months, depending on how hard you run the machine.
Why do my ribbons keep sticking to the compactor rollers?
It almost always comes down to three things: your scraper blades are dull or set wrong, your powder blend has too much moisture in it, or your internal roller cooling system failed, causing the rollers to run hot and melt the powder onto the metal.
When is it time to actually replace the scraper blades?
Don’t wait for them to snap. Replace them the moment you feel a burr, see them warping, or notice powder slipping past them even when the tension is right. A lot of high-volume plants just replace them once a month as cheap insurance.
Does feed screw speed really matter that much in dry granulation?
Absolutely. The feed screw forces the air out of the powder and pushes it into the rollers. Run it too fast, and you’ll jam the rollers and spike the hydraulic pressure. Run it too slow, and the rollers starve, giving you weak, crumbly ribbons.
What causes the hydraulic pressure to fluctuate wildly?
If your gauge is bouncing around, you usually have air trapped in the hydraulic lines, a blown internal seal in the crushing cylinders, or your hopper is feeding powder so erratically that the machine is constantly trying to auto-compensate.
What is the best way to clean out a feeding hopper?
If your compactor has a modular design, take the hopper completely off. Break down the agitators and clean everything with an approved solvent. The absolute most important rule: make sure it is 100% bone dry before putting it back, or your powder will instantly stick to the moisture.
Is there a “normal” gap size for pharmaceutical roller compactors?
It totally depends on the powder you are running and the specific machine, but generally speaking, most pharmaceutical applications run with a roller gap set somewhere between 1.0 mm and 4.0 mm to get that perfect ribbon density.